In this article you will understand different screens of Saleculator under various operations. #
Login Screen: #
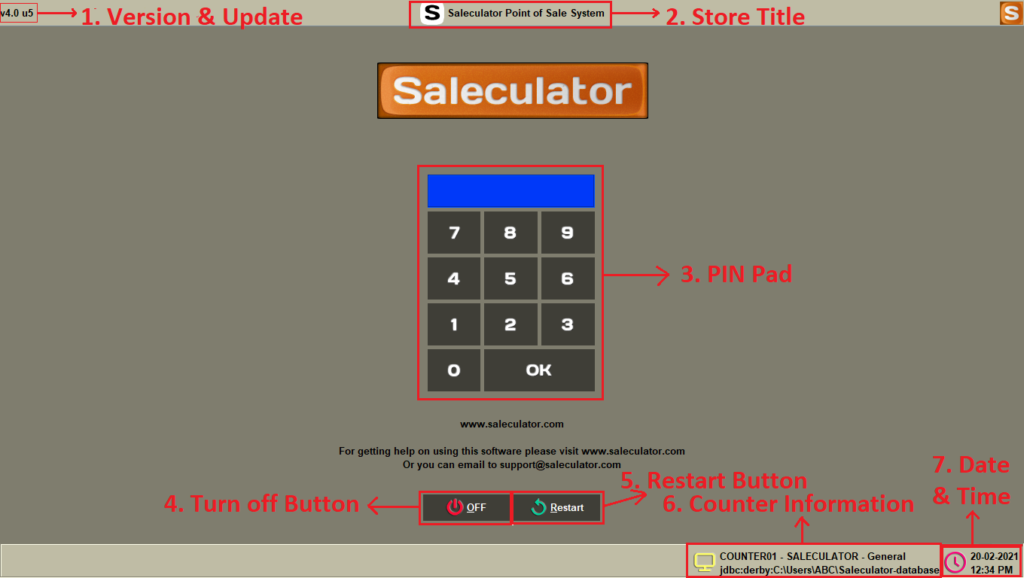
Once you open the Saleculator it will land you in the Login Screen. This is where you will use your PIN to enter into the POS. The Restart and Exit (Off) buttons are available on this screen.
Titles & Control elements:
1. Version & Update
Version number and Update sequence of the Saleculator POS are shown on this field
2. Store Title
The Store name/Title are shown on this field
3. PIN Pad
Field where you type the PIN number
4. Turn Off Button
Pressing this button turns off / exits the POS system
5. Restart Button
Pressing this button restarts the POS system
6. Counter Information
Counter number and other counter related info are visible on this field
7. Date & Time field
Shows the current date and time
Sales Screen: #
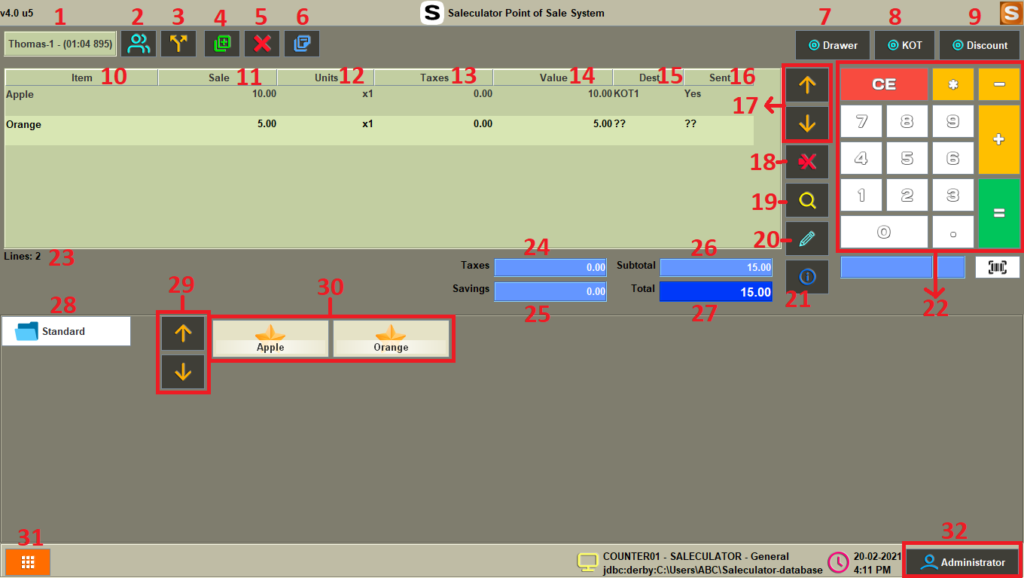
This is the default screen you get once logging into the POS. This is where you will perform the sales and billing transactions.
Titles & Control elements:
1. Customer name & Time field
The name of the existing/new customer with time is visible on this field
2. Select Customer button
Click this button to add or search for a customer
3. Split Bill Button
Click this button to split the current/existing bill into two different bills
4. New Bill Button
Click this button to hold the current bill onto the queue in case of any interruption
5. Delete Bill Button
Click this button to delete the current bill
6. Bill Queue Button
Click this button to retrieve a held receipt/bill from the queue
7. Drawer Button
Click this button to open the cash drawer
8. KOT Button
Click this button to send the bill to corresponding kitchen printers (Restaurant Mode)
9. Discount Button
Click this button to apply discounts on the current bill
10. Item field
Shows name of the Item selected
11. Sale field
Shows the selling price
12. Units field
Shows the units of items
13. Taxes field
Shows the Tax applied
14. Value field
Shows the total value of the specific line item
15. Dest field
Shows the KOT destination (Restaurant Mode)
16. Sent field
Indicates whether the bill is being forwarded to the respective KOTs (Restaurant Mode)
17. Scroll buttons
Scroll up and down between the line items
18. Delete Line Button
Deletes the line that is selected
19. Search Product Button
Search for specific product with name, reference number and bar code
20. Edit Line Button
Click this button to change the units and price of the selected line item
21. Attributes Button
Click this button to add additional features to the selected line item
22. Virtual Keypad
Use this keypad to enter the price, other numerical values, increase/decrease the quantity and to execute the bills
23. Lines Indicator
Shows the total number of lines in a specific bill
24. Taxes field
Shows the total tax applied to the bill
25. Savings field
Shows the total savings made on the bill
26. Subtotal field
Shows the subtotal on the current bill
27. Total field
Shows the final total of the current bill
28. Category List
Shows the list of product categories on this area
29. Scroll Button
Scroll through the list of product categories
30. Items field
Shows the list of Items/products on this field
31. Menu Button
Click this to open the Main Menu
32. User Role Button
Shows the role of current user, pressing this button will get you back to the Login Screen
Leave a Reply